I've been indulging myself by stitching both of the recently released "Creeps" from NeedleDeeva and the 6 witches' hats by Kelly Clark.
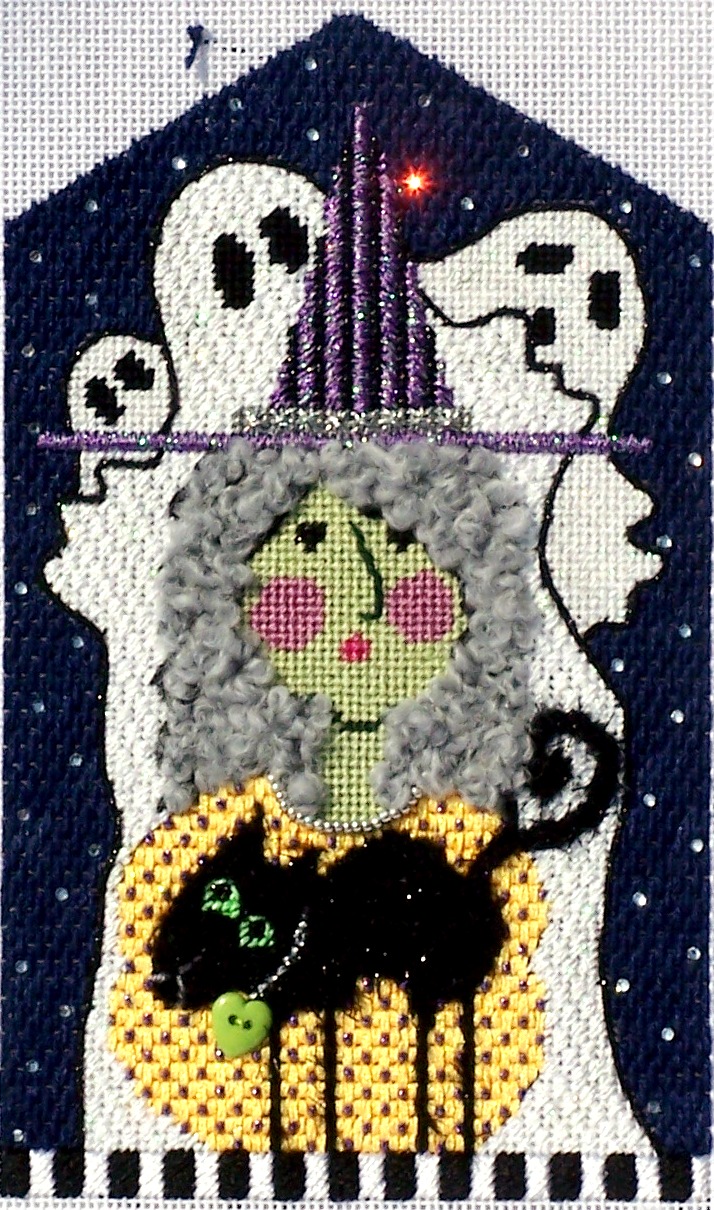
I had reached the last step in the stitch guide for the Pumpkin hat by Kelly and I felt I was all thumbs. No matter what I tried, I couldn't combine 7mm ribbon, ruching and beads in a way that made me happy. Many bad words were used. In desperation, I drove OTB (Over the Bridge) to the nearest Michael's for an easier embellishment solution. I searched the ribbon section, almost giving up, when I spotted 2 possibilities: a 3/8" black gimp and a 5/8" black gimp with black velveteen ribbon running through it. Not having had the foresight to bring the canvas, I bought both of them. I ended up using them both--the narrower gimp on the hat brim and the wider gimp under the pumpkin...ghoulish couture realized.
While in Michael's I also gathered what I would need to make a black feather wreath like the one Robin King is shown holding in the latest issue of Needlepoint Now. Having put a Styrofoam wreath form, black spray paint, 6 black feather boas, extra bags of black feathers and silk ribbon for the hanger in my cart, I did some mental arithmetic. Adding in the time spent not stitching, I decided I should look for a ready-made wreath. To hedge my bets, I bought 2 boas (I can always wear them in the shop in October) and some extra black feathers in case the purchased wreath is skimpy. When I arrived home, I went straight to the computer and found the perfect wreath. From JoAnn Fabrics, it is 19" in diameter and 50-% off I can't wait to decorate for the howlidays.
Sunday, September 25, 2011
Tuesday, September 20, 2011
Creeps from Needle Deeva
As many of you know, the first canvas in "The Creeps" series by Needle Deeva has arrived. I saw all the finished models at the Columbus market, fell in love and will (selfishly) be stitching the complete set for myself. I had intended to show this as a new canvas in progress, in my stitching rotation, but I had so much fun I finished it in no time at all. The extremely talented Robin King wrote the stitch guides that come with each canvas. Her guides are always very clearly written and illustrated and I always learn something new--a new thread, a new stitch or a combination of the two. My favorites from the Pumpkin were the two composite stitches. The best part about this 9 month club is that you can pick and choose your canvases without signing up for all of them. And of course, you can always go "back in time" if you change your mind and pick up an already released canvas.
Monday, September 5, 2011
Kelly Clark witch hats
We have Kelly Clark's trunk show in the shop and I am treating myself to the six witches' hats and the stitch guide created for them.
I have started with the Pumpkin hat, adding a few of my touches to the piece. I am adding the large flat beads to the hat brim, as suggested in the guide. Because the stitch is a full coverage stitch, I am leaving the center stitch open to allow me to place the beads properly.
I had a great time looking for beads and such on the Fusion Beads website (www.fusionbeads.com). They lured me in with a 20% off weekend sale and I stocked up on all things that glitter, especially in Halloween and Christmas colors. And the stash just continues to grow....
Tuesday, August 30, 2011
Mile High Kitty
I'm working on 3 large projects and I needed a quick, fun piece to fit in my "scheduled" stitching. This pretty witch and cat kept me entertained.
The sky is one strand of Impressions in the Irish stitch with Swarovski hot fix crystals for the stars. (That's not a red crystal, its a clear one caught in the sunlight.)
I used the Neon Rays + white glow in the dark thread for the ghosts and Kreinik glow in the dark for the green in the cat's eyes.
The witch's hair is Petite Fluffy Fleece, couched down with one strand of Splendor.
I love the witch's necklace. I used a product that is new to me--the clear beading thread from The Collection. I have always used Prisms and Sundance beading thread, but I'm open to anything that makes beading easier. The Collection thread was easy to thread through the needle eye and easy to knot. It behaved very well and I will definitely use it again (and again).
I ran the thread (doubled through the needle, knotted and anchored) through Sundance size 11 real metal beads. Once I had the right number of beads for the necklace I sank the needle at the other end of the necklace. I then came back up and tied down/anchored the necklace every few beads. Finally, I came up a third time and ran the needle and thread through the center of the entire string of beads. Voila! Bling!
Wednesday, August 24, 2011
Noah's snow leopards
These leopards are the first pair I have chosen to stitch from the series of 12 Noah's animals by Kelly Clark
These are large animals painted in a small design area on 18 mesh canvas. The spots reminded me of a pointillist painting. To keep the two animals separate from each other, I tweaked the colors of the leopard on the left, trying to use a slightly different palette. Another trick I used was to choose the most distinctive colors on each coat, stitching one color at a time until the most difficult to see color was the only one left.
Since stitching these, I have completed the peacocks and I am now stitching the giraffes. I have found it very helpful to Google photos of the animals I stitch to look for distinctive details.
Tuesday, August 2, 2011
Haunted House by DC Designs
I had to stitch something just for me, something with a stitch guide, something on 13 mesh--I have been stranding and laying too much silk on 18 mesh canvas. I went to my June market class stash and pulled out "Haunted House", canvas by DC designs, stitch guide by Cynthia Thomas. Perfect!
Derek of DC Designs (he is Amanda Lawford's son) started his needlepoint canvas career with the mission of bringing fun, affordable canvases to market. He has truly succeeded.
Cynthia Thomas is an expert at creating stitch guides and a wonderful teacher. It was a delight to just let her guide my needle.
Since a stitch guide is a guide, I wanted to try some "new" threads and to substitute anything else for stranded silk.
I used the new glow-in-the-dark Neon Rays + for the skulls and bones. I found it to be very flat on 13 mesh and in retrospect, would have used it for the moon with a basketweave stitch. I love that the thread is very white and sparkly and does glow in the dark.
I stitched the moon with Brown Paper Packages' Stardust in white. Skeined, it looked very thin to me, but it was very fat on 13 mesh. I would use it for the skulls and bones, if I were stitching this piece again. This is another thread whose brightness and sparkle I appreciate.
In my attempt to take a vacation from stranded silk, I substituted Planet Earth Silk and Neon Rays for a couple of the silks. I'm not a fan of Lorikeet, so I went with Gloriana silk floss for the grass, still staying in the Gloriana family.
For the icing on the cake, I added Swarovski hot fix crystals for the skulls' eyes. JAB makes wonderful skull buttons in XL that look great if you stitch over the painted skulls. Just be aware that the buttons are somewhat fragile--be careful sewing them on and don't use them on an item that will receive abuse (think pillow fights).
I'm not sure what I will be stitching next, but I feel as though I have had a very relaxing and fun break.
Sunday, July 10, 2011
Noah's Peacocks from Kelly Clark
I spent my Sunday afternoon working on my second pair of animals for Kelly Clark's Ark, Noah's Peacocks. (I had to do something while I watched the Cubs lose to the Pirates.)
As I usually do, I started by Googling photos of peacocks and peahens to see what effect I needed to create. Since the animals are small pieces, I can go all out on the main characters.
Most of my time was spent beading, using four different colors of Sundance beads. I am working on a beading class, so I tried a few different threads and techniques to stitch the beads.
For the threads, I tried Splendor in lime green to intensify the color of the lime green beads, one strand doubled through a beading needle. I also used YLI invisible thread, also doubled through a beading needle. For other pieces, I have used Sundance beading thread. The net: they all have their place. Using a silk thread (or a colored beading thread) allows you to manipulate the color of the beads you are using. (From what I have read and heard in classes, silk is preferred over cotton floss.) The advantage of a clear beading thread is that it can be used for all colors of beads, obviating the need for a different color thread for each bead. Some say the nylon threads stretch over time, but I have not experienced that. However, if I were stitching a piece that would get a lot of use, like a purse, I would use beading thread, like that offered by Sundance. I love using beading thread when I can because it is so easy to use (nylon thread can drive you nuts).
On the peacocks, I used the "lasso" technique, I went through some beads twice, and I went through some beads only once. I have come to agree with the experts at Sundance that the "lasso" technique is seldom required. Its purpose is to keep the eye of the bead from showing and further secure a bead. However, even if I went through a bead only once, if I used a tight tension and adjusted the bead angle with my needle, the beads stayed in the proper position. Also according to the Sundance experts, if you are concerned about truly anchoring a bead, going through it twice is more effective than using the "lasso" technique. I also stitched some of the tail "eyes" by anchoring the first bead, a middle bead and an end bead by going through them twice; the rest were only stitched to the canvas with one pass-through. Basically, you should use the technique that makes you most comfortable with the end results.
If you are truly worried about losing a bead from a finished piece, you should stitch under the bead with the appropriate colored thread before beading. I'm not that paranoid...yet.
Subscribe to:
Posts (Atom)