Friday, December 11, 2009

My newest project

I felt such a relief when I finished my sister’s Tapestry Tent Christmas stocking. When it came back from my finisher I was so inspired that I went back to work on her husband’s stocking, also by Tapestry Tent. I counted the maximum number of days until the December finishing deadline and even tried to psych myself out by stitching my initials and the year 2009 in an inconspicuous place. When even I realized that I was exceptionally crabby each night as I stitched (mostly basketweave due to the level of detail in the painting) I ripped out “09” Next year, Dennis.

I had been casting around, trying to find an inspiring piece when I realized I had one in my stash. I had kept an elephant canvas from a summer trunk show. Part of a large scale nativity set, I thought I would finish it as a pillow. It will look lovely with my Tap Tent 3 monkeys and my Trubey palm trees pillows, completing my exotic family room theme…when I finish stitching them. (Did I mention that I am not a serial stitcher or that I have HOW MANY unfinished/not begun canvases?) I put the elephant on stretcher bars and moved it from room to room just so that I could look at it. Wait a minute I thought, I’m off the hook for that %^&** Christmas stocking (all my stockings have a cursing phase towards the end). I immediately started pulling threads and planning stitches.

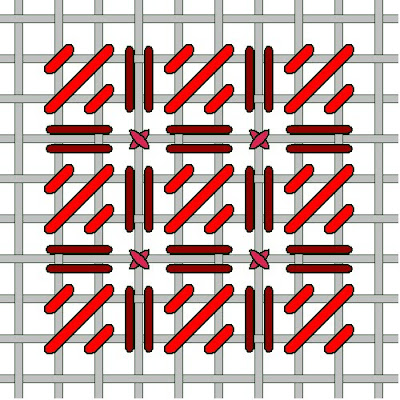
I started with the blanket, ultimately ending up with the Checkerboard Cross in overdyed Kreinik and Sprinkles for the turquoise section. For the purple section, I used the Cross Stitch with

Beads from “Suzy’s Mini Stitches”, substituting Sprinkles cross stitches for the beads because the beads stood out too much from the surface. The oblong cross stitches are done in Burmilana. Still to come—lots of tassels and hot fix Swarovski crystals—and basketweave. The irony is that I had burned out on Santa on the motorcycle because there was so much basketweave to do. As I found myself stitching the elephant’s headpiece in basketweave, looking at more basketweave to come, I realized I was stitching another Tapestry Tent canvas. Even better—I’m going to stitch the entire nativity set. Oh well, at least driving myself crazy is a short trip.

Wednesday, October 28, 2009

Needlepoint monogram on canvas tote

I stitched this 6” x 6" 14 mesh Barbara Bergsten canvas during a couple of television shows—HGTV, of course. I love this as a teaching piece because each stitch is stitch-painted so that once you put the first color in a square, the pattern is easy to see and follow. I used Vineyard Silk as recommended in the stitch guide and it covered very well. I have said in the past that I thought VS was too skimpy on 13 mesh, but it is perfect on 14 mesh. I will use this design for a class in our Florida store in November.

I was going to use this to tote Morgan & Gracie’s leashes and such around, but it’s way too nice. I guess they’ll just have to wait for something else to come along to replace their grocery bag.

Friday, October 16, 2009

Kelly Clark Needlepoint Project

Since finishing the Halloween March pillow, I’ve been fiddling with little projects, trying to find my next big exciting project.

One of the canvases I have stitched lately is the 1st in Kelly Clark’s 12 Days of Christmas ornaments. The baseball playoffs were on, and I needed (mentally) a fairly easy canvas. Kelly’s designs do much of the work, although you can glitz them up like crazy. My few special effects:

The outside border is Petite Very Velvet using a simple cross stitch over 2 X 2. It gives a very cool raised border

The inside border is done in Neon Rays and a very bright green Trebizond using the oblong cross stitch. I love the modern punch of color the green Trebizond adds.

That green is also used on the tips and edges of the tree leaves.
The pears are satin stitched with padding to within an inch of their lives using YLI Shimmer Blend Ribbon.

The partridge is done in random long and short stitch with a combination of Petite Peluche, Fuzzy Stuff and Wisper.

Only 11 more to go!

Wednesday, October 7, 2009

King Arthur continued

The base is a very subtle stitch I found in one of Brenda Hart’s books. It’s a lantern stitch turned sideways. I worked the lanterns in Flair and the background in 8 ply of Splendor.

I made up the sword handle stitch (who knows, though, someone may have invented it first). It’s a variation on the Fern Stitch with the center of the Snowflake stitch, surrounded by tent. The tent direction was reversed in the upper left and lower right quadrants. I used the Fern stitch again, this time with Fyre Werks for the light gray areas of the blade.


The gold medallions hanging from the twisted cord (Kreinik #16 and Perle Cotton 5) are an Octagonal Rhodes in 2 shades of Shimmer Blend Ribbon. After I made my twisted cord, I unraveled one end and carried each thread to the back and anchored it. I couched the cording down and unraveled the other end, again taking the tails to the back and anchoring them. It was time consuming and nerve-wracking, but gluing the tails under the cording is wrong on many counts.

As we all know, one is the loneliest number, two starts a collection and three or more means you are a collector. Time to choose my second large nutcracker!

Wednesday, September 16, 2009

King Arthur large Nutcracker

Yes, I’ve been away from my blog for a while. This Michigan winter was so long (snow from November to April) that I stitched more canvases than ever. Now they are coming back from the finishers and I have time to write a bit before the Florida snowbirds start coming in droves.

I love the JB nutcrackers because their faces are usually fierce, just like the Steinbach nutcrackers I collect. King Arthur was finished quickly, not only because he is on 13 mesh, but because the canvas lent itself to large stitches. The large stitches were a real treat, since I am usually poring through my books looking for very small stitches for 18 mesh canvases.

The King’s crown was stitched in Kreinik gold braid #16. I broke the points and the base into individual sections, combining whatever stitches fit the area. The base is made of two rows top and bottom of Smyrna crosses alternating with the Mosaic stitch. The five rows in between were stitched with the Crossed Rice Stitch from June McKnight’s book of border stitches. I glued the rhinestones in place and anchored them with Jessica stitches.

His hair, mustache and beard were stitched with Silk & Ivory. His hair is done in Encroaching Gobelin over 4 and his mustache is the Stem/Outline stitch. For the beard, I stitched Plaited Gobelin, illustrated in “The Needlepoint Book” by Jo Christensen.

His cape, cuffs and coat border are stitched in white and black Angora in Giant Brick. I still haven’t decided whether to brush the fur with a soft toothbrush. And yes, Ruth Dilts and Joan Lohr were right (and why wouldn’t they be)—you can’t use a nap brush on Angora—it shreds it.

The center section of gold was done in reverse Mosaic with a full Mosaic centered down the middle and the sides ½ Mosaic stitch.

The main body of the coat is a 3-part stitch. The main stitch is a Mosaic in Silk & Ivory. The second part of the stitch was done in Patina, 2 stitches framing each side of the Mosaic, leaving a blank intersection. The third part is a cross-stitch done in Kreinik #12. The sleeves are stitched in alternating rows of vertical slanted Gobelin over 2 in Silk & Ivory and vertical tent in Kreinik #12.

Friday, July 17, 2009

Lollipop back - more on crystals

Click to enlargeWhen I got my lollipop back from the finisher, I was really pleased with the results. (Click on photo for more detail.)

First, the finisher had used a pink Lucite stick for the lollipop--smaller in diameter than the painted one that came with it, something I liked very much. Also, the pink went really well with the Swarovski crystals I used for “bling”. Since the Lucite comes in varying lengths (up to 3 feet) and in 3 different colors, it opens up all kinds of options. Longer lengths will allow for finished pieces of varying height, and I can just imagined how wonderful a needlepoint star would be for a little fairy princess.

Second, I loved my crystals. I used SS.20 rose pink ones for the dots on the canvas. I have learned a few more tips about working with hot fix applicators. Although the crystals are firmly affixed on the finished piece, I found that you have to apply them after the nearby stitching is complete or the leverage from trying to fit stitches under and around them will pop them off. Also, the directions that come with the applicator result in burned fingers, at least for me. Instead of trying to place a crystal in the right sized tip and then flipping it to attach the crystals, I found that placing them on the canvas or stitches and then applying the hot tip to the crystal gave the perfect result, even allowing me to move the crystal slightly for perfect placement. After counting to 10, the crystal is fixed in place.

It looks like I might have to stitch the entire set of lollipops—and then there are the hearts for Valentine’s, the stars for the 4th and the….

Sunday, June 14, 2009

What I learned in needlepoint school

Once again I had the pleasure of taking classes from Joan Lohr and Ruth Dilts, who I refer to as “The Rainbow Girls” because of their connection with Rainbow Gallery. No matter how old you are or how many classes you have taken, there’s always something to learn.


Starting and stopping threads could be a class in itself. In the Valentine House class (canvas provided by Susan Roberts, threads provided by Rainbow Gallery) we used pin knots under Rhodes hearts and away knots with tails long enough that the knot can be cut, the tail threaded in a needle and then woven under the just-stitched area. This keeps dark threads from showing through under lighter adjacent areas, especially if the neighboring area is stitched with a light coverage stitch.


Thread ideas included using Very Velvet or the petite version as the under layer for a padded stitch. It will give good height and grips really well. A favorite combination for a night sky uses Petite Treasure Braid and Impressions in combination. I loved the use of Fyre Werks Soft Sheen FT53 (espresso) for the chocolate kisses—you could almost taste the Hershey’s milk chocolate.


From the Hearts and Clouds class (canvas by Alice Peterson, threads by Rainbow Gallery) I was reminded to go up a needle size when using Flair or Frosty Rays—the needle paves the way for the thread and the canvas will go back where it belongs after the stitch is done.


I had never thought about which direction to stitch with threads like Arctic Rays, Fuzzy Stuff and the like, but it makes total sense to come up in a full hole and go down in an empty hole. This fluffs up the thread and maximizes the effect. Afterwards, tease the threads with the eye of the needle or a soft toothbrush to make things very fuzzy. I was surprised to hear Joan recommend against using a bunka brush on Angora, preferring a soft toothbrush to bring up the nap. I am working on a large nutcracker, King Richard, and I have used Angora for his ermine cape and cuff trim. Since I am a stubborn sort, I will be stitching in the margins and comparing the effect of a nap brush vs. a toothbrush.


Here’s a great idea for finishing a nursery canvas if no pillow or wall hanging is needed. Set the stitched canvas in a glass-topped tray or have your framer make one for you. This can rest on top of nursery furniture and hold powder, wipes and other baby paraphernalia.


Finally, I was reminded that you can change the colors of baby/children canvases to suit either a boy or girl if you love the design and it doesn’t have an appropriate combination. So as long as you can get full coverage from the thread and the stitch combination, you can make any design work for you.


Happy stitching!

Thursday, May 28, 2009

Personalized needlepoint canvases

Before I start almost all of my projects, I make a color copy of the canvas. If the canvas is too large for my desktop copier, I take it to a professional copy shop. The copy is useful for making notes about threads and stitches used and for placement of embellishments when the stitching is finished.


In this case. I am painting out the candy canes. I intend to attach JAB candy cane buttons when the piece is finally stitched, having stitched over the original images.


I use Liquitex Acrylic Artist Color paints because they are very true to color and dry well. They can be mixed to create custom colors and thinned with water for the appropriate coverage. I use either a straw to blow the excess paint out of the holes in the canvas, or an aerosol duster.


Painting out images you do not want or intend to cover with an embellishment is just another way to make a canvas your very own.

Wednesday, April 29, 2009

Halloween March needlepoint back from finisher

The Halloween March canvas is on order and headed to the Bristly Thistle.

Here’s my finished pillow—I had so much fun stitching it and our pillow finisher did an incredible job matching the fabric and trim to make the canvas truly outstanding.

Saturday, April 18, 2009

Grand Hotel needlepoint complete

And here it is finished! Check out the personalized lid - this can be added to any Limoges box. If you can see it, I found a small American flag that fits perfectly on the design.

This canvas from Julia's Needleworks is available only at the Bristly Thistle.

Saturday, April 11, 2009

Halloween needlepoint finishing

These spooky Halloween ornaments were a gift from a stitching friend / fiend. I love the charms that the finisher added at the top—can you see the dancing skeleton at the top of the black candy cane? The Arctic Rays used for the cording adds a further frightening touch.

Saturday, April 4, 2009

Grand Hotel needlepoint finished!


This week brought over 6” of snow to Good Hart. Putting the final touches on this canvas kept me from losing my sanity. It will be May before the trillium appear and the lilacs bloom, but I could imagine the beauty of Michigan summer while I stitched.

The detail on the Grand Hotel is such that most of the building was stitched in basketweave. I used Splendor for the gray areas. In classes this January I learned that I have been using too many ply of Splendor on 18 mesh canvas. I went down to three strands for all the gray areas except the small windows, where I used two strands. And yes, you do have to use a laying tool when you use more than one strand—it was especially important for full coverage with two strands. The flowers around the hotel were done in tent and French knots using Grandeur, Perle cotton #5, Burmilana (for the perfect mauve) and Pure and Simple. The horse bodies were stitched in interlocking Gobelin. I added manes to the horses’ necks.

The sky is stitched using one strand of Impressions in a darning stitch. When you stitch darning stitches, it’s very important to anchor your thread at the beginning and the end of each row. The last thing you want is for the threads to come loose after the piece is finished. For the clouds, I first tried stitching the blue outline with Trebizond, planning to fill in with more Trebizond. I didn’t like the heavy look and ripped out all the outlines using my favorite curved scissors with the very sharp points. I then satin-stitched the clouds using white Flair. Much better.

The grass is one of my favorite sections--I turned the Parisian stitch on its side and used Boucle’ for the thread. It gave a different texture and depth to the “front” of the canvas.

The top of the Limoges box is stitched with a basketweave background and overdyed silk for the leaves. For the lilac blooms I played around with Splendor silk ribbon, using lazy daisy and padded satin with beaded centers. I will be stitching another one of these canvases and I am going to try French knots and variegated silk ribbon for the petals.

This canvas is a gift and will be embroidered inside to really personalize it.

With thoughts of Spring….Michele

Darning stitch

Wednesday, March 25, 2009

Cowgirl needlepoint finished

I am so pleased with the finishing on my girls’ 2009 Christmas ornaments. The difficult corners were stitched perfectly and I love the embroidery on the back. Each ornament has the recipient’s name and the year on the back. Now it’s time to start my 2010 ornaments!

Saturday, March 7, 2009

Kelly Clark needlepoint project

This wonderful canvas by Kelly Clark is one that I kept for myself from last summer’s trunk show. I had a lot of fun stitching it.

My favorite stitch was the Woven Trame’ for the main body of the basket. The trame’ thread was 2 ply of a dark brown Pebbly Perle cotton; the woven stitches were done with 2 ply of a light camel Burmilana. You could also make the basket 3-D by using a wire framework.

At the very end, I played with what I have said is my new favorite thing—hot fix Swarovski crystals. I stitched the sky using 4-way continental stitch and #12 Kreinik braid, which meant that I couldn’t use Kreinik for French knots because you would see the carry thread from the front. I’m burned out on beading at the moment, so I used 2mm hot fix rhinestones in the color Crystal. Here’s what I learned.

1)You need to have a steady hand and accurate placement to cover the spot. The 2mm crystals cover 1 mesh of the canvas, and being just a little bit off will leave the spot uncovered. I went back and covered the white spots for the stars which meant that I had to reheat the crystal to set it firmly in place.

2)To pick the crystals up, I poured them into a small shallow white china bowl. I flipped them so that the crystal side was up, the hot fix side down. I then used the heated applicator with the appropriate head to pick up a crystal. The crystals can get stuck sideways or stick to the side of the applicator, so make sure that the crystal is in with the flat side out before you set it in place. I had the best luck when I picked it up gently, rather than pressing firmly. Since this was my first time to set this size crystal, I ruined a few, so I threw out all the remnants to make sure I didn’t end up using a spent one later.

3)Despite the claims I have heard, I did experience some melting of the black Kreinik thread around the crystal, but it was not obvious, finally stopped pressing so firmly into the canvas. (I did not experience melting or discoloration when I set 4mm crystals on silk.) If the crystal did not set completely, I used the edge of the heated element to heat the crystal (you can also use a craft iron to set the crystals). I had good success when I added a crystal to an area that was stitched over completely with Kreinik.

Stay tuned for more hot fix flashes.

Saturday, February 28, 2009

Needlepoint Peasant Dress

I just finished the canvas featured in a class taught by Amy Bunger at Market. Her stitch guide introduced me to some new threads and accessories and I thought I would share my thoughts with you.

There were three products from Gloriana—a 13mm silk ribbon, Lorikeet and Princess Perle Petite. The ribbon was used to make the rose at the top of the dress. 13mm ribbon is hard to find and this ribbon is hand-dyed. I liked the effect of the ribbon worked with the colonial running rose stitch. The ribbon was very thin, but I think it has to be for a use like this. Lorikeet is a 9 strand overdyed wool thread; Amy used two strands for the woven stitch she called for. I liked the thread—it didn’t shred or pill, and you can clearly use any number of strands from the thread. The Princess Perle Petite gave me fits—it reminded me of Patina in its slipperiness and was difficult to work with. I would substitute Trebizond or Grandeur for the Princess Perle Petite.

I used Silk Lame’ Braid from Rainbow in two colors. This is a silk, rayon and polyester braid with sparkle that works on 16 to 18 ct canvases and on 13 to 16 ct canvas if you are using a long stitch. I liked this thread—it didn’t shred or split and was easy to handle. The range of colors is good and it’s fun to use something relatively new.

Vineyard Silk in two colors was called for in the stitch guide. This silk is beautifully and evenly dyed; it doesn’t shred or pill. One strand (as is) provides full coverage on 18 ct canvas--the manufacturer says that it can be used color-on-color on 13 or 14 ct canvas, but I didn’t think it covered well enough. I loved stitching with it so much that I am adding the entire classic color line to my store.

My absolute favorite new products were the 4mm hot set Swarovski crystals and the electric tool to set them. The 4mm crystals cover 4 stitches in a box shape. After setting the crystals, I tried like mad to pull them off—no chance. This is my new favorite thing—I’m going to try smaller crystals for the stars on my current Tapestry Tent Christmas stocking. And of course, I’m adding them to my store. They are super-easy to apply and the effect is wonderful. You just need to make sure that you are covering all the threads with the crystal before you let it hot set. The applicator heats to a cotton setting and it doesn’t melt or burn the adjacent threads. What a great way to add bling to canvases!

Saturday, February 21, 2009

Pay attention in needlepoint class

I had the pleasure of taking an all day class at market taught by Amy Bunger. With a class filled with a noted needlepoint author, nationally known teachers and shop owners, she moved at great speed. My head was spinning when we broke up after the morning session.

One of the many tips that Amy gave related to the green and black band on this Pretty Peasant Dress canvas. Although I heard it, it didn’t register again until I stitched the band at home. The red scissors on the right show the wrong way to work a satin stitch around the black squares. The stainless steel scissors on the left show the right way to work the stitch.

On the right you can see that I stitched across the corners of the squares, thus clipping or rounding the corners. The right way to stitch around the squares is to end the satin stitch in the corner of the square and begin another one in the corner of the square, splitting what would be a long stitch into 2 or 3 sections.

And now it’s time for me to go back and rip out a few stitches….

Saturday, February 14, 2009

"Noel" part 4

Finally, the cuff, where I really hated the stocking. This was the last section I worked on. I tried a number of different background stitches in the outside margins, but they either let too much of the white canvas show or they drew attention away from the main design. I settled on Basketweave (boring) in a paler blue from the same family as the sky colors. I loved the lettering, but when I stitched it with Kreinik, it faded away. I then stitched over it with the Ribbon Floss I used for the sleigh. This was a little better, but the lettering still faded away, especially at night. In frustration, I picked up the #4 Kreinik I used to couch the braided trim and outlined each letter…and now I am back in love with the stocking.I have one last step to complete. I have decided that I want my stockings to be passed on through the family, so I have stopped putting names on the cuff. Instead I will stitch a name or monogram tag that coordinates with the stocking. I started with my own stocking—that way no one has to name the cat or dog Michele. (Heaven knows there won’t be any grandchildren named for me!)

My favorite words of advice from Brenda Hart are that you need to step back and admire your work as you stitch. As stitchers it is so easy to “get into the weeds” and focus too much on individual stitches, ignoring the overall effect. When I get tired of stitching a Christmas stocking I prop it up in the evening light and I can see how it will look hanging on the mantel. “Noel” definitely glows and shows all the effects I was hoping for.

My next Christmas stocking is for my brother-in-law. He has a Harley Davidson “Fat Boy”, so his Tapestry Tent stocking features Santa on a bright red motorcycle. I love this stocking…for now!

Saturday, February 7, 2009

"Noel" part 3

The background is done in Alicia’s lace using 2 strands of Accentuate doubled through the needle for a total of 4 strands. I was able to match the blues perfectly using two shades of Accentuate. For the finishing touch, I beaded all the snowflakes and gold stars using Prisms doubled through my needle. I love Prisms for beading because it doesn’t bleed, it is finer than beading thread, very strong and you don’t have to change thread when the bead color changes.


The fur on Santa’s robe and hat is stitched in a random long and short using one strand of Wisper. I kept building layers until I was happy with the result. I still haven’t decided whether or not to brush it with a nap brush. Santa’s beard and hair are stitched using 2 strands of Floche in a twisted stem stitch. (This is beautifully illustrated in the book “Knots, Fur and Turkey Work”.)

Saturday, January 31, 2009

"Noel" part 2

The sleigh gave me fits. I started with Kreinik braid, trying the outline stem stitch. It didn’t work. I then tried couching a braided trim from Access Commodities, starting with the scroll shape at the bottom of the stocking cuff. I decided the effect was too dark and strong for the entire sleigh, but I kept the scroll in place. I like it and I am sticking with my resolution to refrain from ripping stitches out until I am absolutely certain they don’t work. I finally tried basketweave using 2 shades of Neon Rays and one gold Shimmer Blend ribbon floss. The sleigh glows but doesn’t overwhelm the piece.

I then alternated between stitching the teddy bear in French knots using 2 strands of Burmilana and stitching the tree in random long and shorts stitches using one strand of two different Wildflowers colors. I have found that using one strand of a thread like Wildflowers or Wisper and building layers results in a much finer effect than doubling the thread. It’s hard not to want to rush, but if you compare the two results (layering one strand vs. stitching with multiple strands) you’ll go for the slower approach. Besides, if you are stitching an heirloom, you might as well do it right. The star is a button I picked up on one of my many searches for embellishments and the ornaments are from a Little Charmers bead set that matched the painted colors perfectly. Little Charmers come in about 15 different colorways, often with different size beads mixed in.

Monday, January 26, 2009

"Noel" stocking is finished!


I have finally finished “Noel” for my sister, only one month later than advertised. (We won’t even consider the purchase/start date for this Tapestry Tent stocking.) I always have a love/hate relationship with my Christmas stockings. I love them for the first 60% and then I get bored or frustrated because I can see in my mind’s eye what the finished stocking will look like and I want to move on to the next fun project. I am finally back in love with this one.

I began with Santa’s robe; the painting was so detailed that I decided to stitch it in basketweave using Petite Very Velvet and Kreinik braid in #8 and #12. The bag is also done in basketweave using Soie Crystal silk and Kreinik blending filament. The filament shredded at every opportunity which is why I now use Accentuate filament. Accentuate is stronger, does not shred or break and comes in a ton of colors. The green corners on the bag are Smyrna crosses done in green Kreinik #12.

The pony is also stitched using Petite Very Velvet. His mane is stitched in random satin stitches. The boots are stitched in basketweave with Petite Very Velvet and Kreinik braid for the buckle.

Friday, January 16, 2009

Hat on the Cat Needlepoint


Yesterday I had a great time--I took two classes from nationally known teacher Cynthia Thomas. My favorite stitch is the one for the green hat; it's a Star Octagon variation. By removing the center stitches from the Star Octagon and replacing them with a bead set in the resulting hole, Cynthia created a new stitch. She suggested looking at stitch books in a whole new way--look for a part of the stitch to remove and replace with a bead or beads. I can't wait to get home and use this idea for some of my "in the works" canvases.

Stay tuned--today I have an all day class with Amy Bunger.

Happy stitching!

Tuesday, January 6, 2009

Good Hart Needlepoint

Having found that I need the carrot and stick approach to finishing large stockings, this is yet another carrot for hours of basketweave.

A few of my favorite things….

I added the “Good heart” because we live in Good Hart Michigan. The heart is a Rhodes heart.

For the snow, which was painted with a multiple of blues and greens mixed with white, I used a long stitch variation with Snow and an overdyed Kreinik that matched the painted colors. I stitched with two needles, one threaded with Snow and the other with the Kreinik. A magnet set kept the unused needle and thread parked away from the action.

The tree was done with a long and short stitch using Boucle’ for the greens (also used for the holly bough trim) and Fuzzy Stuff for the snow.

For the smoke from the chimney, I unraveled Flair and couched it down. It was great fun to unravel the Flair—it was a bit of revenge for its tendency to do that on its own.

Still stitching the cuff on the stocking in basketweave…and now working on two Halloween candy canes that my good friend Linda gave me for Christmas. You’ll see them next!