Showing posts with label needlepoint stitch. Show all posts

Tuesday, December 11, 2012

"Bling, Glitz & Glamour for Needlepoint"

I've been threatening for years to teach a class devoted to beading and embellishment.

I recently took the time to read my autographed copy of June McKnight's book about needlepoint bling.  And guess what?  June has already written the class for me.

The book has loads of color photos and diagrams,  cool stitches that incorporate beads, sequins, embellishments, rhinestones and more.  I learned more than a couple of new things, always good.  I definitely recommend this for stitchers who have or want to go beyond just needlepoint.

We have a few of these in stock now!

Sunday, July 15, 2012

The Happy Witch

This is the second panel of 5 from Julie Mar & Friends, with the stitch guide by Patricia Dee.

Sometimes I am a stickler for mirror image stitches, i.e., one side has the stitch slanting in one direction, the opposite side slants in the opposite direction.  I loved Pat's choice of the Souffle stitch for the Happy Witch's cloak, but I wanted the left side to mirror the right.

Usually, you just need to turn a stitch diagram a 1/4 turn to get the mirror image.  You can see that this doesn't work with this stitch.  So here is Reverse Souffle, "for your alleged pleasantry" as one of my beloved high school English teacher used to say.  (She would introduce herself at the beginning of the year--"My name is Mrs. Null, it rhymes with dull."  She was anything but dull.)

Sunday, July 8, 2012

Count Dracula by Julie Mar

How handsome is this guy?  Widow's peak, bedroom eyes, cleft chin, and there's something about that smile....

This is one of 5 canvases in a series by Patricia Dee of Julie Mar Designs.  You can choose individual characters or, as I did, buy all 5 with the stitch guide and the ceramic painted knob.  They make up into a very cool lidded box for Halloween.

I tweaked the guide a bit to make it my own...and these are a few of my favorite things.  I found a great Mandarin floss color for his pasty face; the candle flame is a glowing Fyre Werks; the candle is stitched with a Renaissance thread and the dripping wax is made of French knots using an over-dyed Kreinik.

Next up--the Happy Witch.

Monday, January 2, 2012

Another Creepy finished!

I'm starting the New Year in a rush--stitching Mehitabel the Witch from NeedleDeeva in less than 2 days. And I took plenty of time off for football and food!

I didn't have Lorikeet in Bright Orange on hand, but I did have it in Narcissus Dark, an overdye.  The result makes me smile--it's a reminder of my youngest daughter's latest (beautiful) hair coloring effect, called Ombre'.

Many stitchers hate using Lorikeet because it can be hard to separate the 9 strands of wool.  The trick is to start separating about 3/4 to 1" from the end, teasing the strands apart.  Then it's a simple matter of pulling each strand from the end.  Really!

Now, what about the name Mehitabel?  It is a Hebrew name meaning "God rejoices", but it is most well known as the name of a fictional cat.  Author Don Marquis started writing newspaper articles "ghost written" by a cockroach named Archy whose best friend is a cat named Mehitabel.  (Thank you Google.)

Happy New Year and Happy Stitching to All!

Sunday, December 18, 2011

The Spider Queen

After my latest stocking was finished, I said I was working on lots of ornaments.  The Spider Queen was a Sunday afternoon project (I didn't say they were all Christmas).  Again, what's not to love about this series with stitch guides by Robin King?

Robin was so good about incorporating many threads in each piece and also making sure that these threads get used on multiple Creeps.

My favorite stitch is the Elliot Stitch.  Done in two shades of lavender, it gives a feminine touch that belies the fierce look of this black widow.

Saturday, October 15, 2011

Creepy Devil

What a handsome devil we have here.  This is the latest release of "the Creeps" from Needle Deeva, with stitch guide by Robin King.

I only made one change--I stitched the stars in glow-in-the-dark Kreinik.  "The Creeps" are addictive!

Monday, October 3, 2011

Creepy Hooty Owl finished

My Hooty Owl canvas is finished and will be back soon to hang on my Halloween tree.

Hooty and Robin King (and NeedleDeeva, of course) were featured in the most recent issue of Needlepoint Now.  You may have noticed that the current canvases differ in color from the one Robin stitched.  It's not uncommon for production canvases to vary from the pre-production canvases, causing bits (or more) of havoc for the stitch guide author.

I chose to follow the colors Robin used, especially for the background.  This meant that I had to use a full coverage stitch--basketweave.  I used Silk Lame' and needed a card plus part of another--so make sure you buy 2 10 yard skeins or cards if you decide to change the canvas background color.

I can't wait for the next "Creep" to arrive!

Sunday, September 25, 2011

Kelly Clark Pumpkin Hat

I've been indulging myself by stitching both of the recently released "Creeps" from NeedleDeeva and the 6 witches' hats by Kelly Clark.

I had reached the last step in the stitch guide for the Pumpkin hat by Kelly and I felt I was all thumbs.  No matter what I tried, I couldn't combine 7mm ribbon, ruching and beads in a way that made me happy.  Many bad words were used.  In desperation, I drove OTB (Over the Bridge) to the nearest Michael's for an easier embellishment solution.  I searched the ribbon section, almost giving up, when I spotted 2 possibilities:  a 3/8" black gimp and a 5/8" black gimp with black velveteen ribbon running through it.  Not having had the foresight to bring the canvas, I bought both of them.  I ended up using them both--the narrower gimp on the hat brim and the wider gimp under the pumpkin...ghoulish couture realized.

While in Michael's I also gathered what I would need to make a black feather wreath like the one Robin King is shown holding in the latest issue of Needlepoint Now.  Having put a Styrofoam wreath form,  black spray paint, 6 black feather boas, extra bags of black feathers and silk ribbon for the hanger in my cart, I did some mental arithmetic.  Adding in the time spent not stitching, I decided I should look for a ready-made wreath.  To hedge my bets, I bought 2 boas (I can always wear them in the shop in October) and some extra black feathers in case the purchased wreath is skimpy.  When I arrived home, I went straight to the computer and found the perfect wreath.  From JoAnn Fabrics, it is 19" in diameter and 50-% off  I can't wait to decorate for the howlidays.

Tuesday, September 20, 2011

Creeps from Needle Deeva

As many of you know, the first canvas in "The Creeps" series by Needle Deeva has arrived. I saw all the finished models at the Columbus market, fell in love and will (selfishly) be stitching the complete set for myself. I had intended to show this as a new canvas in progress, in my stitching rotation, but I had so much fun I finished it in no time at all. The extremely talented Robin King wrote the stitch guides that come with each canvas. Her guides are always very clearly written and illustrated and I always learn something new--a new thread, a new stitch or a combination of the two. My favorites from the Pumpkin were the two composite stitches. The best part about this 9 month club is that you can pick and choose your canvases without signing up for all of them. And of course, you can always go "back in time" if you change your mind and pick up an already released canvas.

Monday, September 5, 2011

Kelly Clark witch hats

We have Kelly Clark's trunk show in the shop and I am treating myself to the six witches' hats and the stitch guide created for them. I have started with the Pumpkin hat, adding a few of my touches to the piece. I am adding the large flat beads to the hat brim, as suggested in the guide. Because the stitch is a full coverage stitch, I am leaving the center stitch open to allow me to place the beads properly. I had a great time looking for beads and such on the Fusion Beads website (www.fusionbeads.com). They lured me in with a 20% off weekend sale and I stocked up on all things that glitter, especially in Halloween and Christmas colors. And the stash just continues to grow....

Tuesday, August 30, 2011

Mile High Kitty

I'm working on 3 large projects and I needed a quick, fun piece to fit in my "scheduled" stitching. This pretty witch and cat kept me entertained.

The sky is one strand of Impressions in the Irish stitch with Swarovski hot fix crystals for the stars. (That's not a red crystal, its a clear one caught in the sunlight.)

I used the Neon Rays + white glow in the dark thread for the ghosts and Kreinik glow in the dark for the green in the cat's eyes.

The witch's hair is Petite Fluffy Fleece, couched down with one strand of Splendor.

I love the witch's necklace. I used a product that is new to me--the clear beading thread from The Collection. I have always used Prisms and Sundance beading thread, but I'm open to anything that makes beading easier. The Collection thread was easy to thread through the needle eye and easy to knot. It behaved very well and I will definitely use it again (and again).

I ran the thread (doubled through the needle, knotted and anchored) through Sundance size 11 real metal beads. Once I had the right number of beads for the necklace I sank the needle at the other end of the necklace. I then came back up and tied down/anchored the necklace every few beads. Finally, I came up a third time and ran the needle and thread through the center of the entire string of beads. Voila! Bling!

Wednesday, August 24, 2011

Noah's snow leopards

These leopards are the first pair I have chosen to stitch from the series of 12 Noah's animals by Kelly Clark

These are large animals painted in a small design area on 18 mesh canvas.  The spots reminded me of a pointillist painting.  To keep the two animals separate from each other, I tweaked the colors of the leopard on the left, trying to use a slightly different palette.  Another trick I used was to choose the most distinctive colors on each coat, stitching one color at a time until the most difficult to see color was the only one left.

Since stitching these, I have completed the peacocks and I am now stitching the giraffes.  I have found it very helpful to Google photos of the animals I stitch to look for distinctive details.

Tuesday, August 2, 2011

Haunted House by DC Designs

I had to stitch something just for me, something with a stitch guide, something on 13 mesh--I have been stranding and laying too much silk on 18 mesh canvas.  I went to my June market class stash and pulled out "Haunted House", canvas by DC designs, stitch guide by Cynthia Thomas.  Perfect!

Derek of DC Designs (he is Amanda Lawford's son) started his needlepoint canvas career with the mission of bringing fun, affordable canvases to market.  He has truly succeeded.

Cynthia Thomas is an expert at creating stitch guides and a wonderful teacher.  It was a delight to just let her guide my needle.

Since a stitch guide is a guide, I wanted to try some "new" threads and to substitute anything else for stranded silk.

I used the new glow-in-the-dark Neon Rays + for the skulls and bones.  I found it to be very flat on 13 mesh and in retrospect, would have used it for the moon with a basketweave stitch. I love that the thread is very white and sparkly and does glow in the dark.

I stitched the moon with Brown Paper Packages' Stardust in white.  Skeined, it looked very thin to me, but it was very fat on 13 mesh.  I would use it for the skulls and bones, if I were stitching this piece again.  This is another thread whose brightness and sparkle I appreciate.

In my attempt to take a vacation from stranded silk, I substituted Planet Earth Silk and Neon Rays for a couple of the silks.  I'm not a fan of Lorikeet, so I went with Gloriana silk floss for the grass, still staying in the Gloriana family.

For the icing on the cake, I added Swarovski hot fix crystals for the skulls' eyes.  JAB makes wonderful skull buttons in XL that look great if you stitch over the painted skulls.  Just be aware that the buttons are somewhat fragile--be careful sewing them on and don't use them on an item that will receive abuse (think pillow fights).

I'm not sure what I will be stitching next, but I feel as though I have had a very relaxing and fun break.

Monday, July 4, 2011

My new Cockatiel - from Labors of Love

This beauty from Labors of Love is just another fun canvas in an addictive series. They stitch up in a flash and are so gorgeous on a tree.

For this one, I added one strand of Fuzzy Stuff to Silk Lame', using a long and short stitch for the top feathers.

The top two wing sections are stitched in Nobuko, again with Silk Lame'. the lower wings are done with a Random Satin stitch.

For the lower body, I used the Fern stitch.

My next project--stitching all the Kelly Clark Ark animals, starting with the cheetahs.

I'll be watching the Cubs game this afternoon while I stitch away.

Happy 4th to all!

Sunday, June 12, 2011

Columbus 2011 day 2

Some of my favorite canvases so far
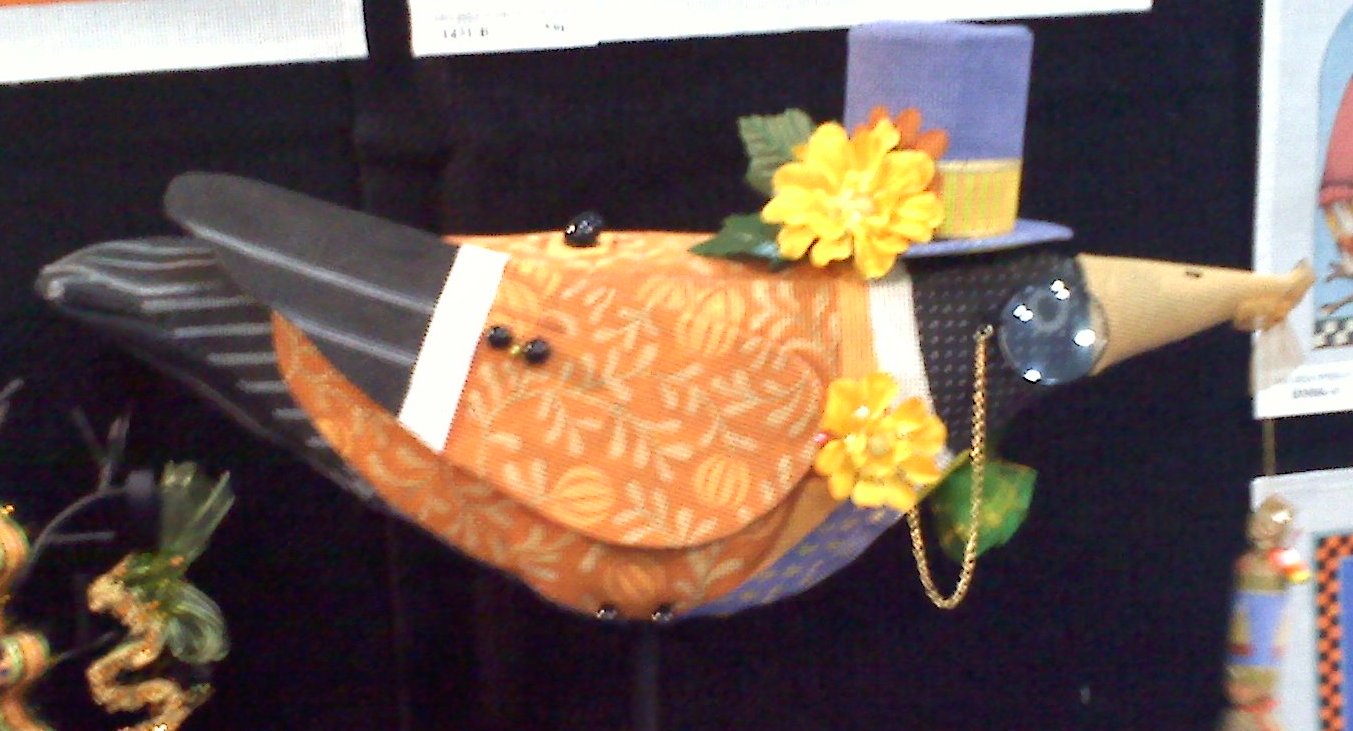
* A 3D crow by Melissa Shirley on 13 count canvas; he comes with a hat and a monocle.
* Also from Melissa, gorgeous orchid purses and fanciful startfish
* From Kelly Clark, 6 witch’s hats that are so wonderful, you want them all. They come with a stitch guide, too.
* Dede Ogden has painted two views from a sitting room. My favorite is a view of the Eifel Tower through the window of a pied-à-terre.  It reminds me of trips to Paris when we rented an apartment instead of staying in a hotel. The second view is from an elegant New York apartment with a fabulous view of Manhattan.
* Labors of Love has new clip on birds to add to our collections, all of them colorful and fun.

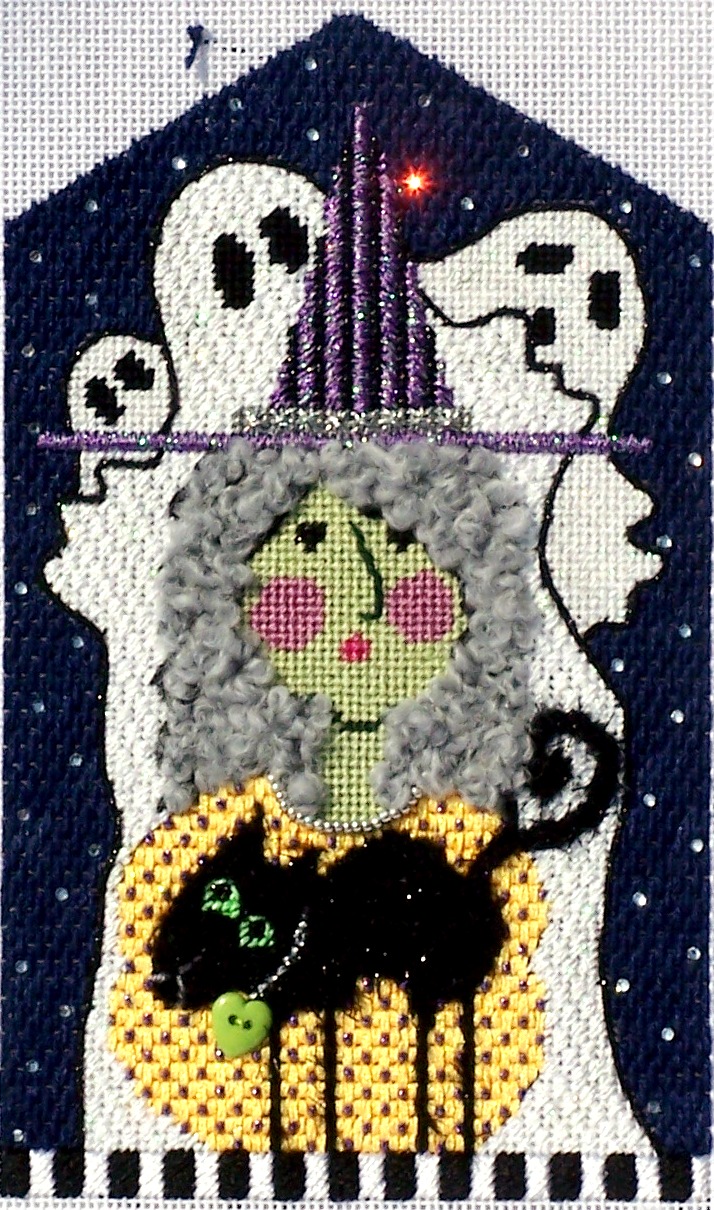
I started the day with a fun class taught by Cynthia Thomas. The canvas was a Halloween House by DC. I’ve had a couple of customers stitch the canvas and I wanted to see what Cynthia could do with it. She taught us a technique borrowed from gold work for two of the lollipops that I can’t wait to try on other canvases. Her stitch guide and instructions were, as always, top notch.

Tips from Cynthia:
* When working with Planet Earth Opal or Vineyard Silk Shimmer, use a larger needle to keep the metallic from coming up short at the end.
* Cynthia demonstrated how to separate Lorikeet, a 9 strand overdyed wool that gives many of us fits. She started by teasing the ends of the thread apart—you can see that it separates into bundles of three. The best way to pull the strands loose is to hang a weight (like the one from Puffin Co) from the end. The real key, though, is patience.

New threads—at least for me
* Rainbow Gallery has introduced 17 new colors for Silk Lame’ for 18 count and new colors for Neon Rays +. The very coolest new Neon Rays + is a white sparkly ribbon that glows in the dark.
* YLI has an organic cotton ribbon floss that comes in the 26 Painter’s Thread colors. I love the texture—a little primitive—and can see ruching it for great effect.

Monday, May 23, 2011

Landscape Stitches Book

We just received the new book from Little Shoppe Canvas Company, "Landscape". This is the first of a series of books to be published, each based on effects for a specific category. "Landscape" includes stitches for clouds, flowers, grass, mountains, sand, shrubbery, sky, snow, soil, stone, trees and water.

I saw a rough draft of the book at market and placed an order on the spot. Now that it is finished, I love it even more and here's why:

  • the categories for natural scenery stitches are all things we stitch often
  • the book is small and lightweight, but packed with ideas each category includes a great variety of stitches, many of which are not in other books that recommend an effect each of the stitches is numbered and shaded for multiple layers
  • each category includes important factors to consider when stitching for that landscape effect
  • stitch hints are provided for each category to optimize stitch and thread choices
  • each chapter begins with a stitching example that shows how to create a specific effect using a combination of threads and stitch.

This book is a welcome addition to my personal library of needlepoint books.  We have them in stock now.

Sunday, May 15, 2011

The Ark Monkey House


Hooray!  Except for the part where I ran out of my silk floss, the Monkey House from the Ark is complete.

I love the stitch I used for the red walls--I found it in Jane Zimmerman's "Canvas Embroidery" Volume One.  The inspiration stitch is a "variation of basic Scotch alternated with elongated Cashmere".  I reduced the row height by one stitch, used 3 strands of silk and the result looks like wood shingles.  The best part is that I only had to rip out one previous stitch to replace it with what I think is the perfect one.

Back to the rooftops of the Ark!

Thursday, April 21, 2011

Ark part 4

The great thing about working on the Ark is that if you can't think of the perfect stitch for an area, you can stitch something else while your brain works on the  problem.  The other great thing is that 6 of us are stitching this together and we are bouncing ideas off each other.  The solution for the diamond area kept eluding me.  I tried stitching a Rhodes the same size as the nearby black rectangles in the pale green.  Boring!  A fellow stitcher suggested a black beaded rectangle in the center.  Since I was going to bead the painted rectangles, this turned out to be the perfect answer.

Tuesday, April 12, 2011

Ark races - second leg

I'm not sure how clearly you can see this, but I have tried two different threads for the same stitch.  One of them will be ripped out....  One side is Trebizond in the perfect colors, but I don't like the loft or the sheen.  One could argue that the roof of the Ark is wet and therefore shiny, but I want a somewhat more rustic finish.  I switched to 2 strands of Soy Luster which I love.  The strands lay perfectly flat, the color works and the roof doesn't overwhelm the windows.

Now back to the Ark race!

Sunday, April 3, 2011

Ark races

I'm having so much fun with this canvas because there are so many different pieces to work on--I can't get bored!

For the main deck of the Ark, I've used an overdyed thread and a random width, random length Cashmere stitch.

The snakes are a simple padded satin with the top layer a Gloriana silk floss.

I will admit to obsessing over the turtles.  I started with the idea of beading them in their entirety, but I would like to finish this piece with my sanity (mostly) intact.  I did bead the black lines and then the obsessing began.  I tried a Kreinik #12 for the gold section of the turtle on right, but felt that it was too flat.  I left the basketweave with that thread on the two sides of the turtle.  For the center, I cross-stitched each thread for a higher profile.

For the turtle on the left, I bumped up to a Kreinik #16 and simple basketweave.  The result:  6 of one, 1/2 a dozen of another.  Maybe the next time I have turtles to stitch, I will bead them.  Maybe.  But only if Brenda Hart makes me.